Back at it again with the archiving things I've written and don't want to lose! I've made so many threads on Twitter with advice for online artists, and now I'm compiling them all in one place.
- Laying out a convention table
- Promoting yourself on the internet
- Running a Kickstarter
- Setting up an ergonomic workstation
- Laying out your portfolio
Laying out a convention table
14/8/2019 (original thread here)
Hey artists, here's a quick n dirty thread about how to lay out your table at conventions. I used to be in charge of floor planning and merchandising when I worked in retail and it's all based on the same idea - guiding the customer's eye.
In general your table will have Small Items (like stickers, £1/2 zines), Medium Items (single issue comics, bigger zines, prints), and your One Big Item (the main thing you're wanting to sell, usually a book if you have one). You want your customer to look at ALL of it!
Make your table interesting (and take longer) to look at by varying the heights of your merchandise:
- flat on the table/stacked in piles
- propped up on a book stand
- propped up on top of a box/stack of books
- pinned to grids/boards
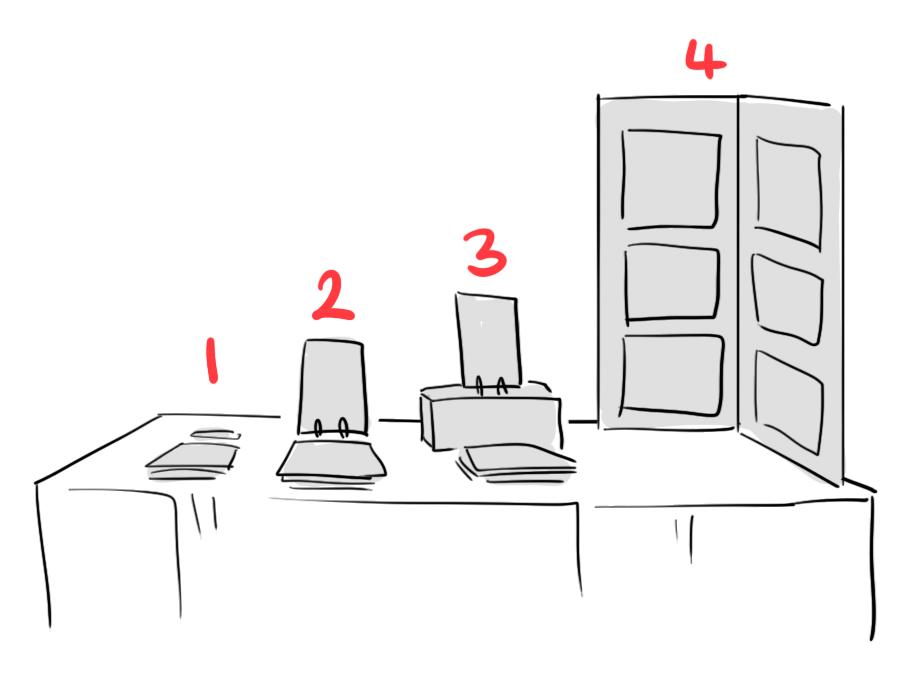
You want your customer to go on a ~*~*~jOuRnEy~*~*~ across your table - see how setting up your table like this would guide the eye towards the next item?
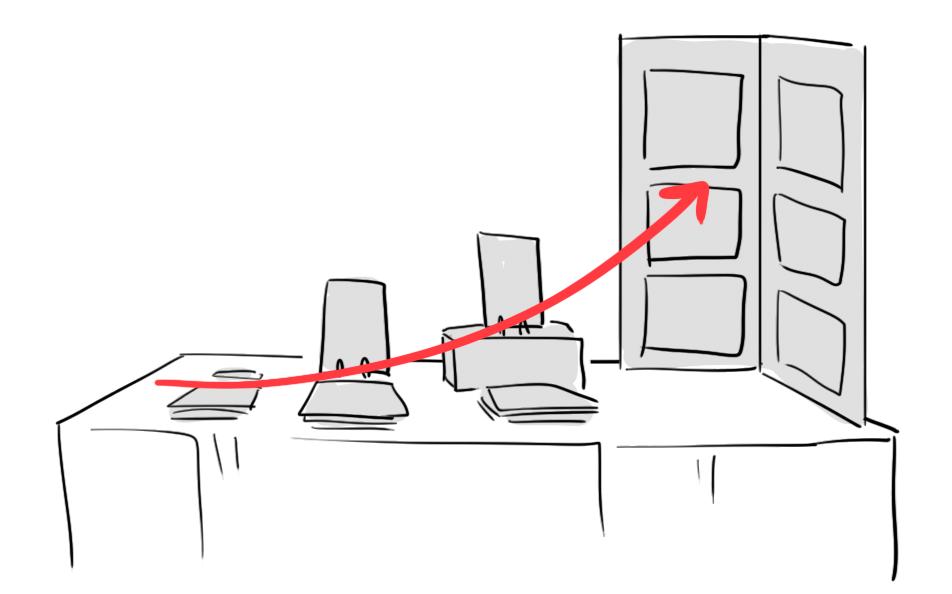
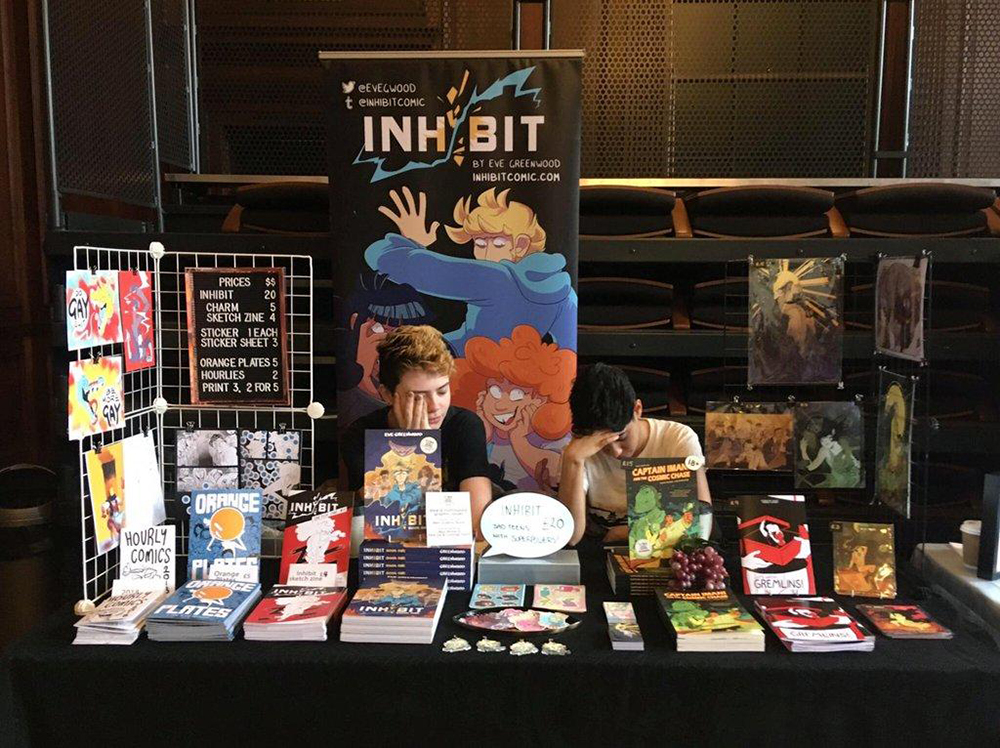
Use this to your advantage and set up your merchandise so that everything points to your One Big Item. Here's a real world example of my tablemate and I. We even made use of the space between our Big Items so the eye would travel from one person's Big Item to the other's!
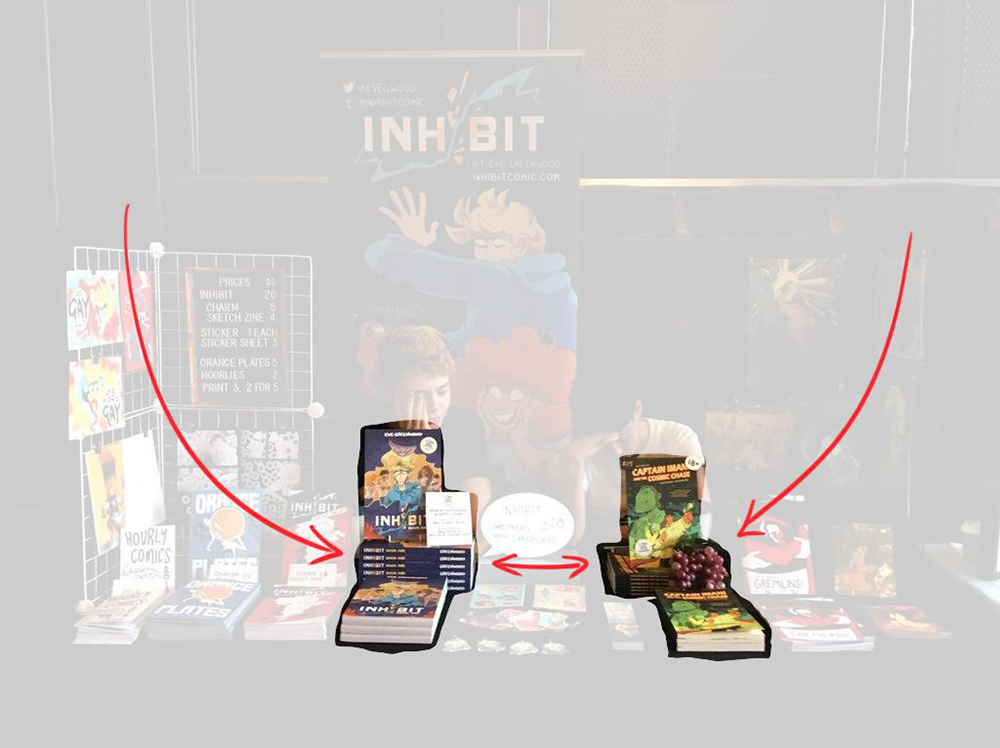
It's important to react to your NEIGHBOUR'S table as well. If you want to try to minimise the dreaded Skimming Glance™, arrange your table so that as a customer looking at your neighbour's table is guided without a break onto your merch. Don't break the ~*~*~jOuRnEy~*~*~
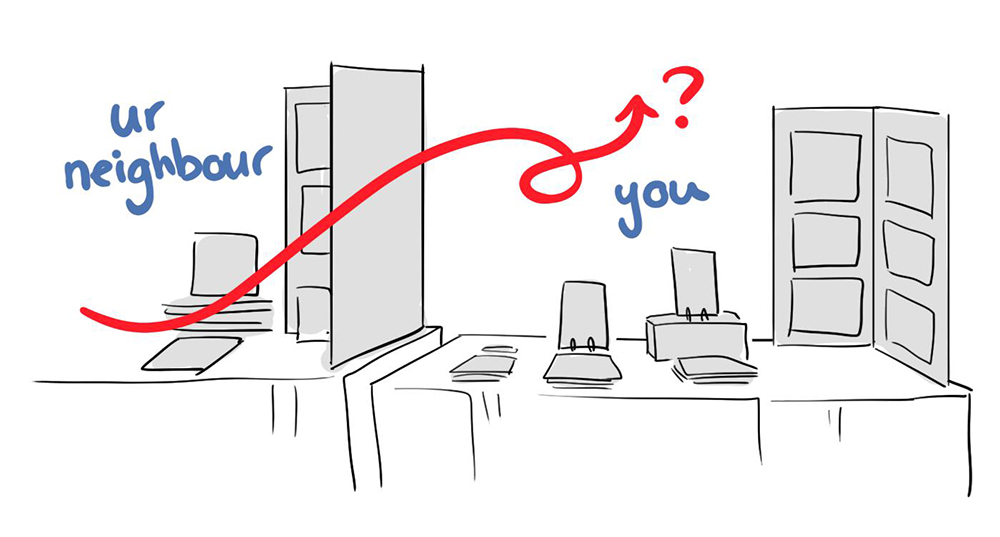
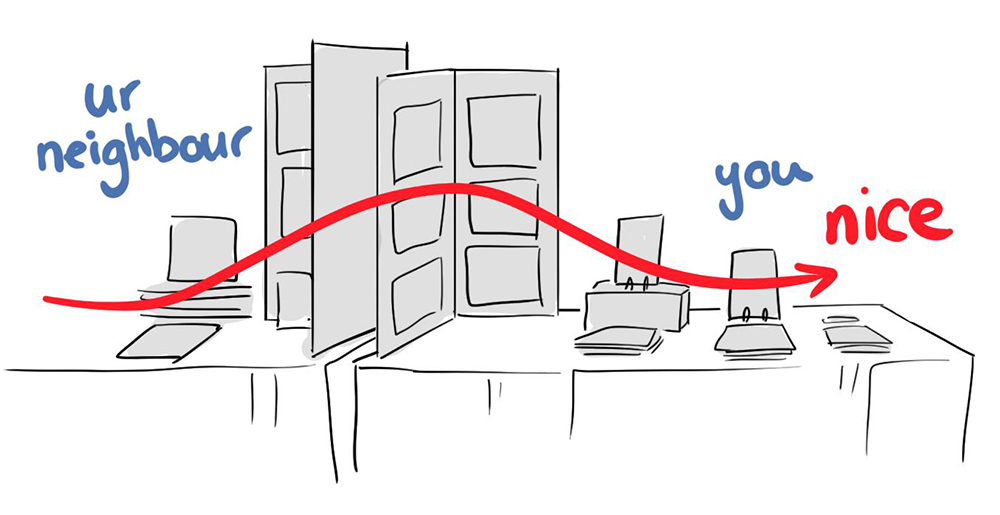
Once you've set up, leave the table and walk towards it from both directions to see what it looks like for an approaching customer. Do you have merch raised high enough so people can see it from a distance? Using prints and stickers to lure in distant customers is a great tactic.
Another fast and furious tip - put your business cards/flyers at both ends of your table so people can grab them when they've finished looking/buying and leave either direction!
If the con you're at allows it (some cons ban outward-facing merch), pin prints or open zine spreads to the outside of your grids to give passersby a preview of your merch! I especially do this with comics/zines that people don't pick up as much so passersby will get a peek at what's inside and hopefully WILL pick it up.
Clearly delineate where your merch ends and your tablemate's starts. Try mirroring the shape of each other's displays (like me and my tablemate did in my example a few tweets ago!) to keep the table looking cohesive while having distinct sides. You don't need to literally draw a line between your stuff and your tablemate's stuff, but having a little break like a flyer/business card section between sections can help to keep your stuff separate in the mind of the customer.
Promoting yourself on the internet
26/11/2020 (original thread here)
How To Promote Your Stuff On The Internet: A Thread
After all the recent online events/conventions, I realised that there are a lot of people who don't understand how to maximise their promotion potential, so here's a quick, basic thread on how to do that!!
- POST YOUR LINKS EVERYWHERE. People are lazy and want to do things as easily as possible. Put your shop/website/patreon link in your Twitter bio, in your pinned tweet, in your IG bio, make links easy to find on your site, put your links everywhere, please oh my god. If you're making a post talking about your shop, put a link to your shop in the tweet (or in the tweet below if you're worried about algorithms). Say "shop link below!". Make it as easy as possible to find your shop! The majority of people will not go looking for the link!!
- POST YOUR EMAIL EVERYWHERE. Someone looking to hire you isn't always going to want to DM you, and if they can't easily find a way to contact you, they'll just skip you. Put it in your bio!! Put it in your pinned tweet!!! Put it in the header of your website!!!
- Related: make a website. If you don't want to make a portfolio website, then make an Instagram or Tumblr where your work is clearly on display. People are lazy. People don't want to scroll through memes to find your work to see if they want to hire you or buy from you.
- Make your Online Branding cohesive, at least during important advertising times. Use the same icon across platforms so that you're recognisable. During TB I made sure to use the exact same image everywhere so people would recognise my work even if they didn't know my name.
- The algorithm sucks and you need to bump your work. A great way to do this without just replying "bump!" or "hey look" to your original post is to add more information with each bump, adding value to the thread.
Hey here's my shop!
↳ Here's something I'm selling there! - Include links and info about what your promotional thread is about in every tweet. What if one tweet gets a bunch of retweets and is shown contextless to hundreds of other people, who, again, are going to be too lazy to click to read the rest of the thread? If your thread is about your shop or a crowdfunding campaign, this can be as simple as a "Buy here: [link]" line at the bottom of the tweet. People are lazy so you have to do the work for them.
- Occasionally make NEW posts about the same thing!! Even if you're bumping everything, people will always miss things. Plus a fresh post will also get engagement from people who already saw and interacted with your original post. If it's a new post about your shop, show new/different merch you're selling! If it's a new post about your crowdfunding campaign, use new promotional pictures!! Or just use the same ones with slightly different wording and bam, fresh new post.
- Stealing this one from @haridraws: something that's super helpful as a commissioner or someone who's hiring is if your bio/pinned tweet has a line like "private commissions closed, business enquiries open [EMAIL]". Now I don't need to ask you! I just know! Thank you!!!
In conclusion, when you're drafting your post promoting yourself, step back and look at it again and think "have I made this as easy as possible to do the thing I'm asking".
OH bonus tip: linking to an instagram account? People are LAZY. Post a link instead of just saying your username! Far less people will look you up if you say "check out my instagram @/evegwood" instead of "check out my instagram http://instagram.com/evegwood"
Running a Kickstarter
28/2/2021 (original thread here)
flash top tips for running a kickstarter
- you don't need a reward tier for every combination of reward, 5 tiers is good, 10 tiers is pushing too many
- unless your ks is for a clothing line i guarantee you do not need to offer shirts, they're expensive to buy and hard to stock
- research the shit out of postage, i see so many people talk about how they lost out on postage when they ran a kickstarter, this has never* happened to me, double check prices the day before you go live. if you live in the uk use http://royalmail.co.uk/price-finder
- "i don't know how much my book is going to weigh how can i estimate shipping" book weight calculator https://www.biddles.co.uk/useful-tools/book-weight-calculator/
- offer simple bonus rewards that will pack neatly alongside your main reward to keep shipping costs low. if you're making a book, flat paper rewards like prints, posters, stickers, bookmarks, bookplates, booklets are all PERFECT. don't offer mugs.
- don't forget that if a website says it'll cost £50 for prints, you'll also need to pay shipping/VAT when it comes time to order them. factor that into your costs.
- edit the hell out of your campaign page. you don't need to show every page of your comic (keep it for updates! people will be excited to see new peeks at the thing they've ordered and it will entice new backers!) keep it easy for people to read and not be overwhelmed
- people are awful at filling out the backer survey so minimise the amount of rewards that rely on backers filling them out to keep your stress low (eg. shirt sizes, names to go in the back of a book, time-sensitive commissions or cameos)
- things you will need to buy that you will probably forget about til it's time:
- all your packaging materials
- labels/paper for printing shipping labels
- shipping costs for all the merch
- proof copies of your merch (your stickers will absolutely print darker than you expect)
- a surprising number of people will buy the pdf. sell the pdf at half the price of the book. "that's too expensive!" no it's not.
- really good point from@MarySafroArt: extra rewards will mean extra shipping costs, and things like tshirts have different weights at different sizes! make sure you thoroughly cost everything to cover all your bases and don't end up making a loss on non-essential rewards!
- special bonus tip: don't ever do this. a) completely pointless and b) extremely embarrassing.
- adding to thread - i understand how calculating shipping can be a pain but knowing exactly how much ppl are going to be charged for shipping is important, esp for international backers. think v hard about putting off postage payments until after the campaign.

Setting up an ergonomic workstation
26/5/2021 (original thread here)
after my Shoulder Disaster in november i have FULLY KITTED OUT my workspace in preparation for returning to drawing. i spent too long working without /any/ of these precautions and i want to run down them because there's at least one in thing in here that you should do.
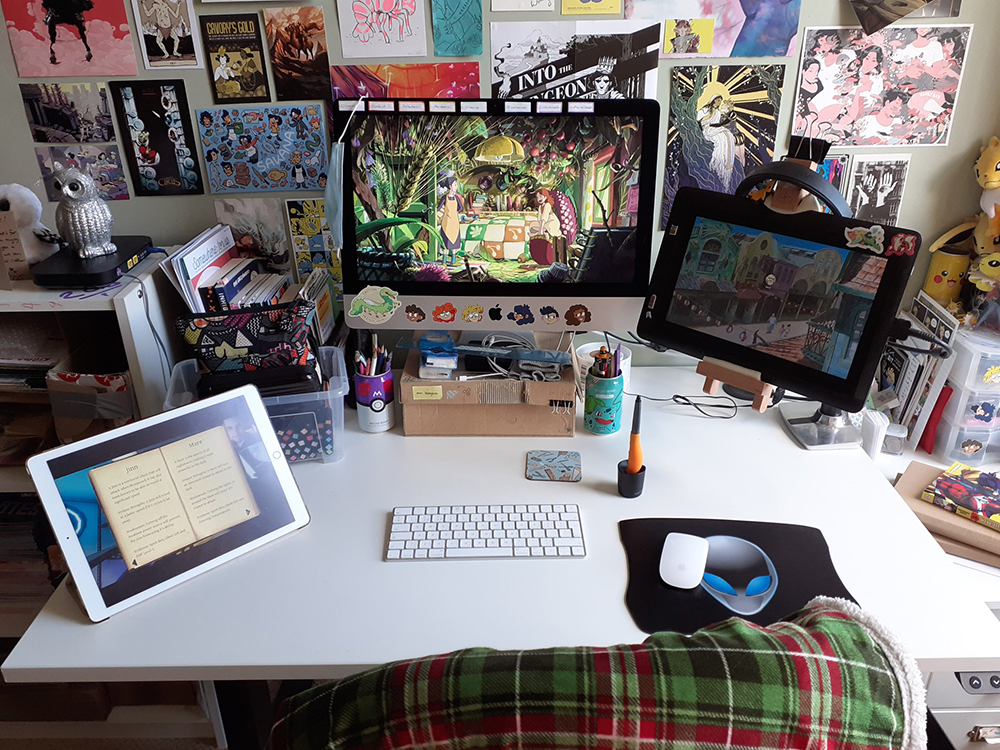
- centred and raised my computer so it's at eye level. it used to be off to the left so my body was permanently twisted to see the screen, and it was too low, which caused neck pains. that pain/discomfort is gone now. you can use anything, im using a shoebox lmao.
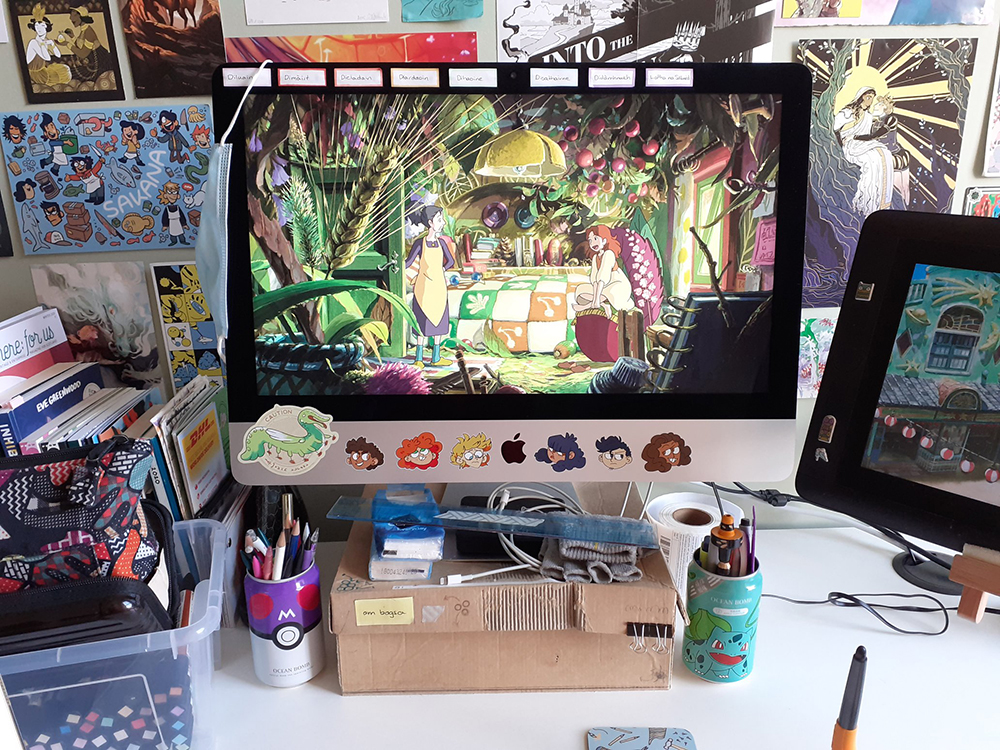
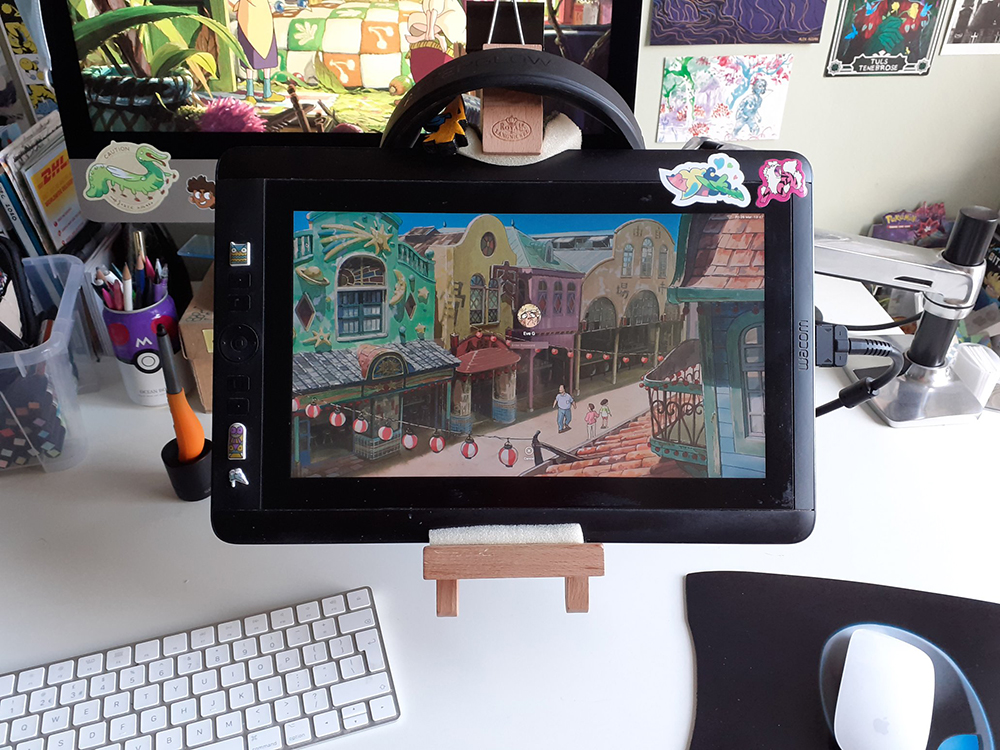
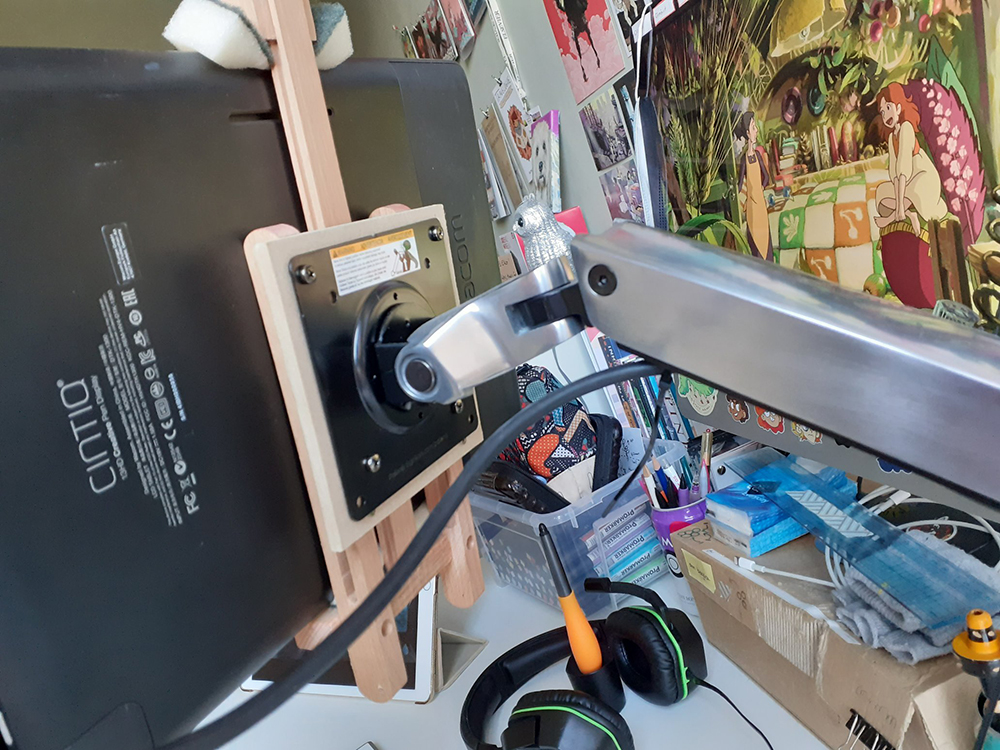
- got an arm for my tablet. the stand that came with it was terrible and even though i had it on a box to raise it, it still wasnt comfortable. my cintiq isnt compatible with this arm so i made a rig out of a small easel and attached it that way (+ used sponges to stop slipping). the arm is good because i can raise/lower/angle the tablet to whatever is comfortable for my shoulder or wrist that day. you don't need an arm!! but if you have a screen tablet make sure it's raised high enough and angled properly so as not to cause shoulder/wrist pain.
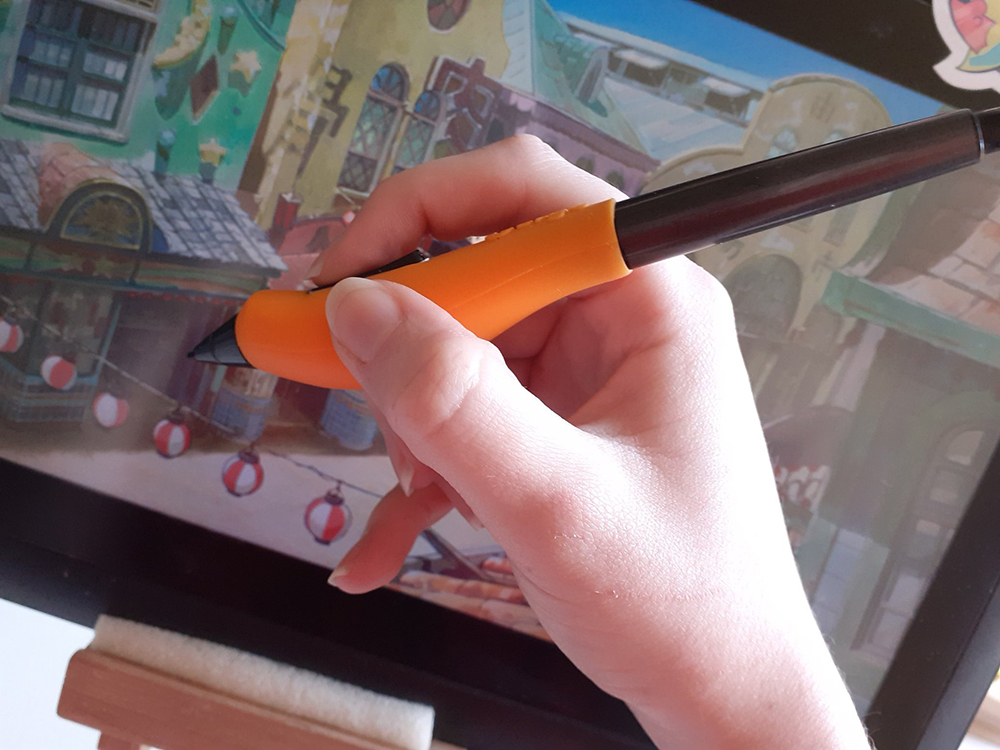
- got a grip for my pen. holding a pen for hours at a time can cause nerve/tendon damage in your hand, wrist, and arm. a grip will help alleviate that pressure. i wanted a branded grip so i could still access the pen buttons but you can do the same by wrapping it in bubble wrap!
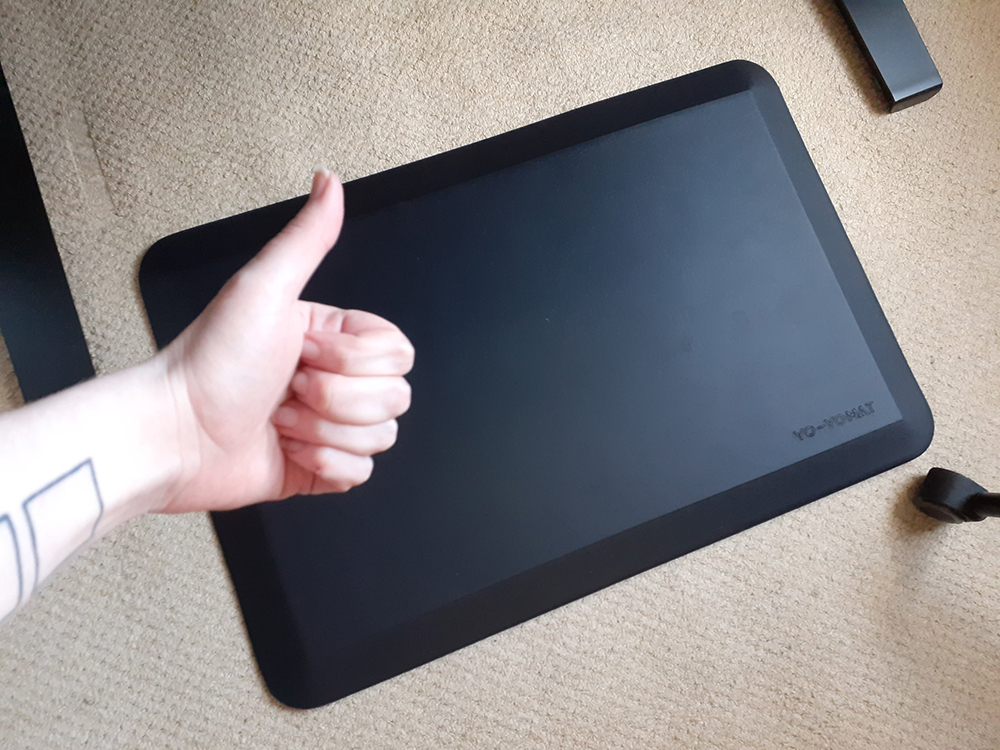
- got a standing desk. sitting hubched over for hours at a time is terrible for your back so being able to swap between standing and sitting has been great. i got a mat to stand on to not cause foot/knee pain after standing for hours! also great to dance on. i got an electric standing desk so i could swap between sitting and standing easily but you dont need to pay for one! you can get the same effect by propping a tabletop on boxes/bricks/whatever. the top should sit just below your elbows so your arms are at 90 degrees when typing.
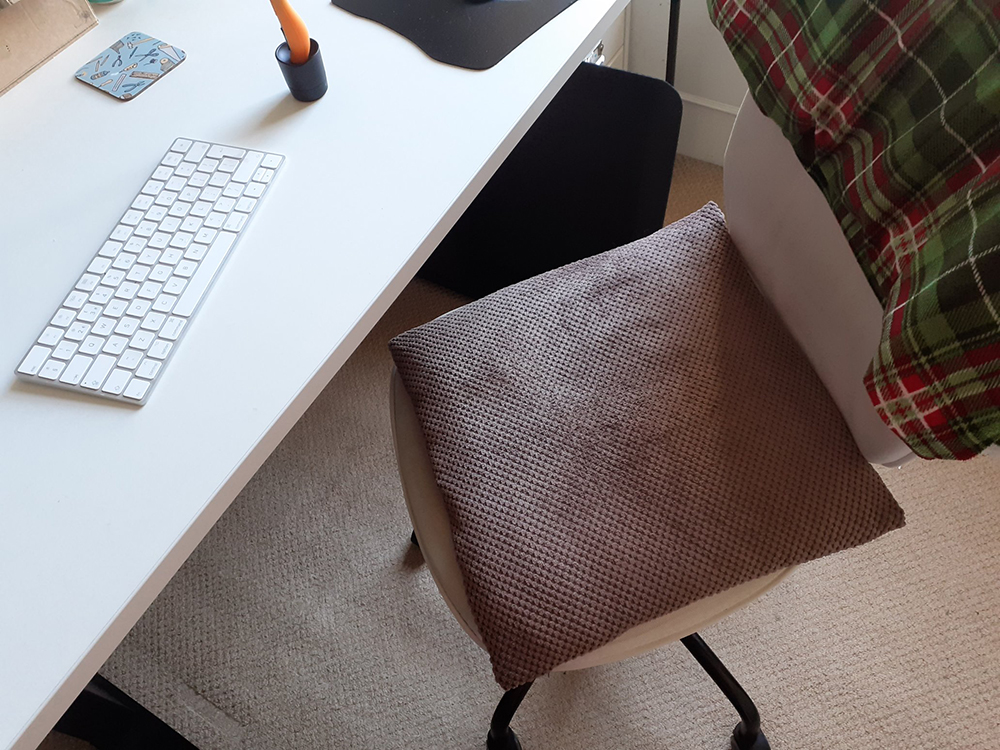
- put a cushion on my chair for my ass!!!!! my chair is a cheapie ikea chair and has NO support. if you cant get a chair with good back support, at the very least put a wee cushion down to ease the pressure on your spine while you sit for hours.
- not a product but i'm also making a conscious effort to sit up straight while i work, either drawing or typing. leaning/hunching over can weaken the back/shoulder muscles and tighten the chest muscles, causing pain
that's it. brand info for anyone curious:
- arm - ergotron lx desk mount
- easel - royal & langnickel REA400
- grip - ergo plus grip
- desk - yo-yo pro 2
- mat - yo-yo mat medium
the ipad was not part of the setup i was just watching jerma
i also want to make a note on the easel - it's not a perfect fit!! i had to attach a small square of wood to the back of the easel, and /that's/ what i screwed the arm attachment plate to. it was really easy to do.
ALSO IMPORTANT: none of this is a replacement for daily stretching and regular exercise. you MUST stretch to the best of your ability before, during, and after drawing. everything here is supplemental.
Laying out your portfolio
28/5/2022 (original thread here)
I've been going through a lot of art portfolios and I have some points I'd like to share about how to make it easier for people to find what they're looking for! Other people might disagree with me but these are all QOL changes /I/ would love to see.
- Put at least one image on your landing page, don't make it a blank page with your name and contact info/a contact form. If I open up 30 portfolios at once in different tabs, I only have so much time to look at your site, I don't want to be clicking around looking for art.
- The very first pictures I see on your portfolio when the website loads are already giving me an idea of your style and taste, so make sure it's a good first impression! Put your absolute FAVOURITE art right at the top, less impressive storyboards/sketches can go lower.
- Separate your pages into types of art (comic, illustration, animation etc) instead of personal work, commissions, etc. If I'm looking for your storyboards, for example, I want to easily find them in one place, not have to go between multiple pages looking for them.
- If you can't do separate pages (you're using Tumblr for example), please clearly indicate what tags I can click on to find specific kinds of art. If you don't have a tag system I'll have to scroll and I hope I'm making it clear that I don't have time to scroll and search.
- Include your email somewhere big and obvious. PLEASE give me the option to email you as well as or instead of giving me a contact form! Maybe just personal preference, but I do check who I've emailed in my sent folder and I hate contact forms.
- If you are using a social media site like Instagram or Tumblr as your portfolio, please don't also post non-your-art things. I'm looking for examples of YOUR work, not other people's art or memes, and I don't want to have to scroll and click about looking for it.
- And to repeat a previous point: if you're using Instagram or Tumblr, make sure your email address is in your bio!! I'm shocked at how many artists are using social media as their portfolios with no way to contact them. I'm not going to DM you.
- A basic one: if you are submitting a portfolio for a specific kind of gig, please make sure there are actually pieces that show your work in that field. A comic portfolio is no use for an illustration gig, that is a different art form and different skill.
- You don't need to upload every single drawing you've ever done to your portfolio; pick your best and favourite ones! Decide which pieces demonstrate different skills and use those, if multiple pieces all show the same thing then remove some of them.
- By this I mean that if you want to show how good you are at drawing elephants for example, use up to 3 drawings of elephants. Your whole portfolio can't be elephants, I get it you can draw elephants, let me see you draw a chair.